Um Guia para Renderização de Design de Interiores que Conquista Clientes
Já tentou explicar uma ideia de design e recebeu apenas um olhar em branco? Uma renderização de design de interiores é a solução. Pense nela menos como um desenho técnico e mais como uma fotografia de um espaço que ainda não existe. Ela transforma todos aqueles plantas baixas abstratas, amostras de cores e conceitos em uma visualização incrivelmente realista do cômodo finalizado.
É assim que você consegue fazer seus clientes realmente sentirem o espaço antes de abrir uma lata de tinta ou encomendar um sofá.
Fechando a Lacuna Entre Ideia e "Entendi!"
No fundo, uma renderização de design de interiores é uma ferramenta de comunicação poderosa. É o que fecha aquela lacuna crucial entre a visão na sua cabeça e o que seu cliente realmente consegue entender. Painéis de inspiração e esboços são ótimos para estabelecer uma vibe, mas uma renderização de alta qualidade cria uma conexão emocional imediata com o design final. Isso constrói confiança e, mais importante, entusiasmo.
Essa é a chave para obter aprovações e vender seu conceito com confiança. Em vez de pedir a um cliente que imagine como a luz da tarde vai bater em uma cadeira de veludo específica, você pode simplesmente mostrar. Esse tipo de clareza evita revisões caras e garante que todos estejam na mesma página desde o primeiro dia.
O Método Tradicional vs. A Nova Onda
Quando se trata de criar esses visuais, a indústria realmente se divide entre dois mundos diferentes:
- Renderização Tradicional: Essa é a abordagem clássica e comprovada. Envolve modelagem 3D meticulosa, configuração de iluminação digital complexa e depois esperar—às vezes por horas—o computador processar a imagem. Ferramentas como V-Ray ou Lumion são os cavalos de trabalho aqui, mas exigem computadores poderosos e muita habilidade técnica.
- Renderização Alimentada por IA: Esse é o novo e rápido garoto da turma. Usa inteligência artificial para gerar imagens incrivelmente realistas em apenas alguns segundos. Você pode começar com um esboço simples, uma foto de um cômodo existente ou um modelo 3D básico. Essa abordagem é uma mudança de jogo, finalmente tornando a visualização de alta qualidade acessível a designers solo e pequenos escritórios que não têm um especialista em renderização dedicado na equipe.
Uma renderização de design de interiores não é apenas uma imagem bonita; é um contrato visual. Mostra ao cliente exatamente o que esperar, transformando uma ideia abstrata em um futuro tangível que ele pode se entusiasmar e investir.
Por Que Visuais São Sua Ferramenta de Negócios Mais Poderosa
A demanda por visuais de alta qualidade não é apenas uma tendência; é um reflexo de um mercado em expansão. A indústria global de design de interiores está a caminho de crescer de USD 145,96 bilhões em 2025 para um impressionante USD 214,35 bilhões até 2034. Uma enorme fatia desse bolo—42% do mercado—é de projetos residenciais.
Em um campo tão competitivo, designers, arquitetos e profissionais de imóveis contam com renderizações para tornar seus discursos inesquecíveis e ganhar mais negócios. Você pode descobrir mais sobre essas tendências de mercado e ver como estão moldando a indústria.
Por muito tempo, o custo e o compromisso de tempo da renderização tradicional tornaram difícil para designers solo ou pequenos estúdios competir com grandes empresas. É exatamente onde as ferramentas modernas de IA estão fazendo a diferença. Ao reduzir o tempo e as barreiras técnicas, elas estão nivelando o campo de jogo, capacitando mais profissionais a criar visuais incríveis que capturam a imaginação do cliente e fecham o negócio.
Entendendo o Fluxo de Trabalho de Renderização Tradicional
Antes de termos ferramentas que pudessem gerar visuais em minutos, criar uma renderização fotorrealista era uma verdadeira arte. Pense em um escultor digital, esculpindo meticulosamente um bloco virtual de mármore. Esse fluxo de trabalho tradicional tem sido a espinha dorsal da indústria por décadas, e é um processo de várias etapas que exige muita habilidade, paciência e poder computacional sério. É como sempre transformamos uma tela em branco em um visual impressionante, mas é um caminho longo e muitas vezes frustrante.
Tudo começa construindo o cômodo do zero. Usando software como SketchUp, 3ds Max ou Revit, um designer ou artista 3D constrói todo o espaço em um ambiente virtual. Cada parede, janela, porta e detalhe de acabamento deve ser modelado com dimensões exatas, essencialmente criando o esqueleto digital da imagem final.
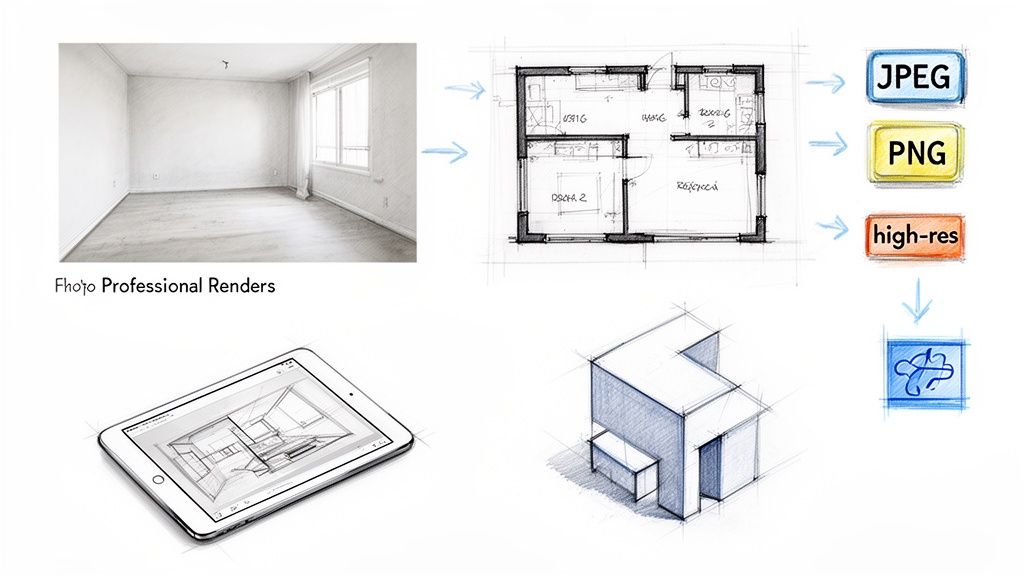
Este diagrama oferece uma visão de alto nível do caminho de uma ideia inicial até o produto final.
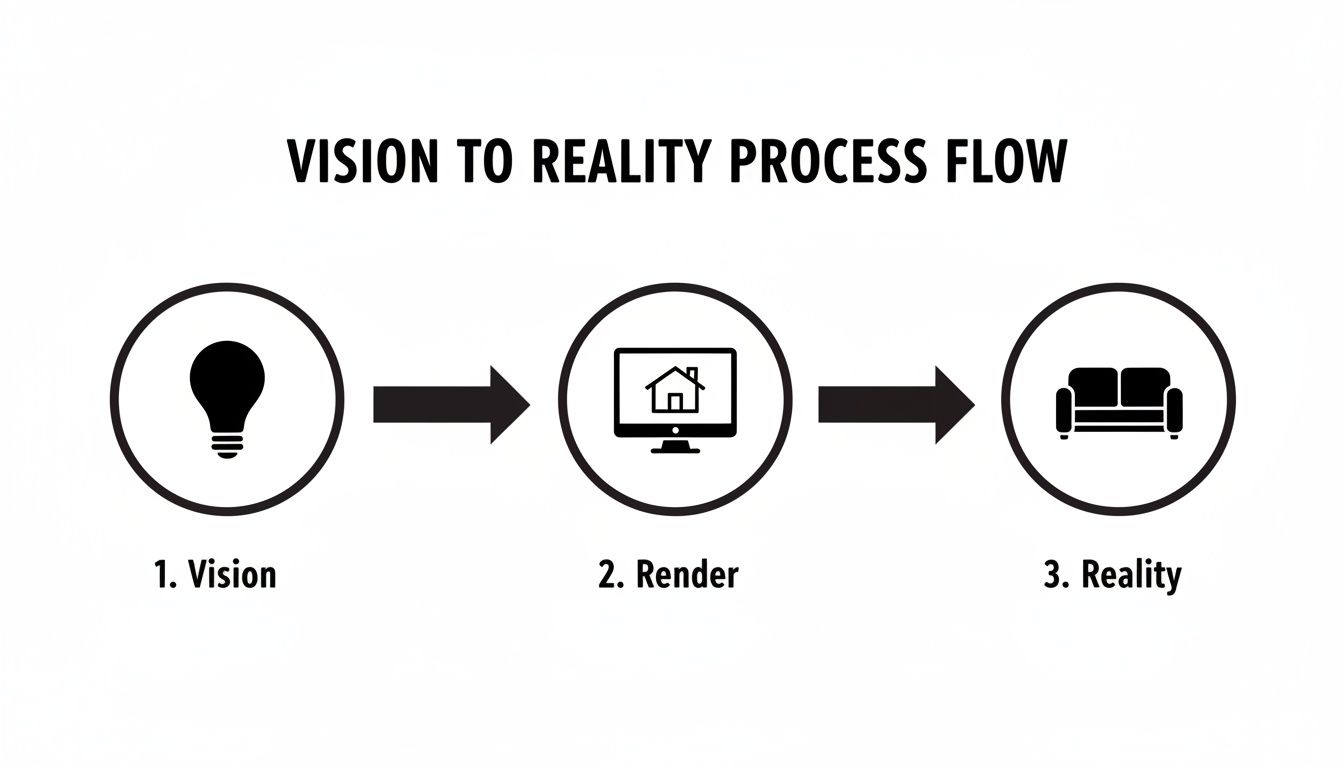
Embora o visual faça parecer simples, o estágio de "Renderização" é onde o verdadeiro consumo de tempo e o trabalho técnico pesado acontecem no processo tradicional.
A Arte dos Materiais Digitais
Uma vez que o modelo 3D é construído, é apenas uma casca cinzenta e sem vida. O próximo passo é dar vida a ele aplicando materiais. Isso não é tão simples quanto apenas escolher uma cor de uma paleta; é sobre criar e atribuir texturas detalhadas que dizem ao computador exatamente como cada superfície deve parecer e se comportar sob luz.
Por exemplo, um piso de madeira não é apenas uma imagem de veio de madeira. O artista tem que ajustar um conjunto inteiro de parâmetros:
- Rugosidade: Isso controla se o acabamento parece um verniz de alto brilho ou uma superfície fosca e oleada.
- Mapas de Relevo: Estes adicionam uma textura física sutil, dando à madeira um veio que você quase consegue sentir com os olhos.
- Reflexão: Isso define com que clareza o piso reflete a luz que entra por uma janela.
Cada material único, desde o veludo em um sofá até o metal escovado em uma luminária, precisa desse mesmo nível obsessivo de detalhe. Acertar pode levar horas de ajustes e requer uma compreensão profunda e quase intuitiva de como os materiais parecem e se sentem no mundo real.
Configurando a Cena com Luz e Sombra
A iluminação é, sem dúvida, a parte mais crítica—e mais difícil—de todo o processo. Em um fluxo de trabalho tradicional, o artista essencialmente se torna um diretor de fotografia virtual, colocando cada fonte de luz manualmente. Estamos falando de tudo, desde o sol fora da janela até a pequena fita LED sob um armário de cozinha.
Para cada luz, o artista tem que configurar sua intensidade, temperatura de cor (é uma luz quente ou fria?) e suavidade da sombra. Acerte errado na iluminação, e até um design de vários milhões de dólares parecerá plano e pouco convincente. É preciso um verdadeiro olho de artista para usar a luz e criar um clima que pareça realista e emocionalmente ressonante.
O maior problema com a renderização tradicional é que é uma rua de mão única. Você configura seus modelos, materiais e luzes, depois clica em "renderizar" e espera... às vezes por horas. Se uma única sombra estiver errada ou uma textura parecer estranha, você tem que voltar, fazer sua melhor suposição de uma correção e começar a longa espera novamente.
A Espera Final e Paciente
Depois que toda a modelagem, texturização e iluminação estão prontas, você finalmente chega à renderização em si. É aqui que o computador pega todas essas informações e calcula como cada raio de luz se refletiria pela sala para produzir a imagem final. É um processo incrivelmente exigente que requer computadores de alta qualidade, caros, com processadores e placas gráficas potentes.
Dependendo da complexidade da imagem e da qualidade que você está buscando, uma única renderização de alta resolução pode levar de 30 minutos a 24 horas—ou até mais. Um conjunto inteiro de imagens para um projeto pode ocupar uma máquina por dias, criando um gargalo massivo na linha do tempo do design. Esse investimento pesado em tempo, hardware e software especializado como V-Ray é exatamente por que esse fluxo de trabalho tem sido tipicamente o domínio de grandes empresas bem financiadas. E é exatamente o problema que as tecnologias mais novas e rápidas estão tentando resolver.
Como a IA Está Mudando o Jogo na Renderização de Design de Interiores
Por décadas, o fluxo de trabalho de renderização tradicional era um mal necessário—uma luta lenta e técnica para transformar um modelo 3D em algo bonito. Funcionava, mas era sempre uma luta contra o relógio. Agora, a inteligência artificial está rasgando aquele velho manual. Todo o processo está mudando de um exercício técnico meticuloso de vários dias para uma sessão criativa fluida e quase instantânea.
Isso não é apenas um pequeno passo adiante; é uma forma completamente diferente de trabalhar. A IA assume as tarefas mais tediosas e demoradas, como iluminação, texturização e processamento final de imagem. Isso o libera para fazer o que você faz melhor: focar na visão criativa. Pense bem—ir de uma ideia bruta para um visual polido no tempo que leva para pegar um café. É isso que é possível hoje.
Você nem precisa mais de um modelo 3D totalmente detalhado para começar. Com IA, seu ponto de partida pode ser muito mais simples:
- Uma foto rápida de um cômodo vazio do seu telefone
- Um modelo 3D básico e sem textura do SketchUp ou Revit
- Até mesmo uma simples planta baixa desenhada à mão ou um esboço em perspectiva
O mecanismo de IA pega essas entradas simples, descobre a geometria do espaço e depois aguarda suas instruções criativas. É aqui que as coisas ficam realmente emocionantes.
De Horas de Ajustes para Segundos de Prompts
Em vez de lutar com centenas de configurações de material ou colocar fontes de luz uma por uma, você agora direciona a IA com prompts de texto simples. É como ter um parceiro criativo brilhante que também é um supercomputador. Você fornece a visão, e ela cuida de todo o trabalho pesado em um instante.
Por exemplo, você poderia fazer upload de uma foto de uma sala de estar vazia e pedir à IA para:
- "Gere um interior estilo Japandi com pisos de carvalho claro, sofá boucle creme e iluminação indireta suave à tarde."
- "Redesenhe este espaço como um loft industrial com tijolos expostos, pisos de concreto polido e iluminação de trilho de metal preto."
Em cerca de 30 segundos, a IA entrega uma renderização de alta qualidade baseada exatamente nas suas palavras. De repente, a necessidade de expertise profunda em software ou um computador potente simplesmente desaparece. Isso abre a porta para muito mais profissionais criarem visuais de primeira qualidade. Para ver isso em ação, confira nossa análise profunda sobre renderização com IA para designers de interiores.
Comparando Renderização Tradicional vs Renderização Alimentada por IA
Para realmente entender a mudança, ajuda ver os métodos antigos e novos lado a lado. Esta tabela decompõe as principais diferenças entre o fluxo de trabalho de renderização convencional e as soluções modernas orientadas por IA como MoldaSpace, mostrando o impacto prático no dia a dia de um designer.
| Aspecto | Renderização Tradicional (ex: V-Ray, Lumion) | Renderização Alimentada por IA (ex: MoldaSpace) |
|---|---|---|
| Velocidade | Horas ou dias por imagem | 30-60 segundos por imagem |
| Entrada Necessária | Modelos 3D detalhados e totalmente texturizados | Fotos, modelos 3D simples ou até esboços |
| Habilidade Técnica | Alta; requer expertise em software complexo | Baixa; baseado em prompts de texto simples e UI |
| Necessidades de Hardware | Computadores poderosos e caros com GPUs de alta qualidade | Qualquer computador padrão com conexão à internet |
| Custo de Iteração | Alto; revisões são muito demoradas | Praticamente zero; crie dúzias de variações facilmente |
| Acessibilidade | Limitada a especialistas em visualização treinados | Acessível a designers, arquitetos e estilistas |
Como você pode ver, a mudança para IA não é apenas fazer a mesma coisa mais rápido—é sobre mudar fundamentalmente o que é possível no processo de design.
O Poder da Iteração Ilimitada
Talvez a maior vitória aqui seja a liberdade de experimentar. Com renderização tradicional, o enorme compromisso de tempo tornava as revisões dolorosas e caras. A maioria dos designers produziria apenas uma ou duas imagens polidas para uma apresentação ao cliente porque fazer mais simplesmente não era prático.
Com IA, o script é invertido. Você pode gerar dez conceitos de design completamente diferentes em menos tempo do que costumava levar para criar uma única imagem. Isso gera uma conversa muito mais rica e colaborativa com seus clientes.
Esse tipo de velocidade é crucial. O mercado global de design de interiores deve atingir cerca de USD 145,96 bilhões até 2026, com enorme demanda vindo dos setores residencial (42% de participação de mercado) e novas construções (46% de participação de mercado). Em um mercado tão competitivo, ser capaz de produzir visuais impressionantes rapidamente não é apenas um diferencial—é essencial para permanecer relevante e crescer seu negócio. Você pode ler uma análise completa do futuro do mercado de design de interiores em fortunebusinessinsights.com.
As ferramentas alimentadas por IA estão nivelando o campo de jogo, permitindo que designers solo e pequenas empresas compitam frente a frente com grandes agências que têm departamentos inteiros de visualização. Isso dá a qualquer pessoa a capacidade de apresentar suas ideias com um brilho profissional que constrói confiança do cliente e ajuda a ganhar mais projetos. A era de esperar por renderizações acabou. A era da criação instantânea começou.
2. Preparando Seus Arquivos para uma Renderização Impecável
Toda grande renderização de design de interiores começa com uma ótima base. Pense como cozinhar: a qualidade dos seus ingredientes impacta diretamente o prato final. Se você está começando com uma foto rápida do seu telefone ou um modelo 3D detalhado, a forma como você prepara seus arquivos de entrada é o passo mais importante para obter resultados profissionais e impressionantes.
A boa notícia é que as ferramentas de renderização modernas são incrivelmente flexíveis. Você não precisa de um modelo 3D perfeitamente construído em nível de arquiteto apenas para começar. Você pode entrar em vários pontos diferentes no seu processo de design, cada um com seus próprios benefícios.
Este fluxo de trabalho é um ótimo exemplo de como até o ponto de partida mais simples pode ser transformado em um visual polido e pronto para cliente.
Tipos de Entrada Comuns e Como Acertá-los
O arquivo com o qual você começa é essencialmente o manual de instruções para o mecanismo de renderização. Quanto mais clara e precisa sua entrada, menos suposições o software precisa fazer, e mais próxima a imagem final estará do que você imaginou.
Aqui estão os pontos de partida mais comuns que vejo designers usarem:
- Uma Fotografia Simples: Essa é a forma mais rápida de começar. Apenas tire uma foto clara e bem iluminada do cômodo. Minha dica profissional? Fique em um canto para capturar o máximo do espaço possível, e tente manter seu telefone nivelado para evitar ângulos estranhos e distorcidos.
- Um Esboço à Mão: Perfeito para aquelas ideias iniciais de "esboço no guardanapo". Um desenho de linha limpo de uma planta baixa ou um esboço em perspectiva simples é muitas vezes tudo que você precisa. Apenas certifique-se de que suas linhas são escuras e distintas para que o software possa reconhecer facilmente a geometria do cômodo.
- Uma Planta Baixa Digital: Se você tem uma planta baixa 2D de um programa como AutoCAD, você já está à frente do jogo. Exporte como um arquivo de imagem simples (JPEG ou PNG funcionam bem) com linhas limpas e sem bagunça extra.
- Um Modelo 3D Básico: Este é o padrão ouro para precisão. Um modelo simples e sem textura "caixa branca" de software como SketchUp, Revit ou 3ds Max fornece a maioria dos dados geométricos. Você nem precisa do arquivo completo; apenas exportar uma visualização clara do seu modelo como uma imagem é o suficiente para começar.
O objetivo não é criar um arquivo de entrada perfeito. É tudo sobre clareza. Seja uma foto ou um esboço, o sistema apenas precisa entender claramente a forma básica do cômodo, proporções e características principais como janelas e portas.
Entendendo Suas Opções de Saída
Uma vez que sua renderização é gerada, você precisa salvá-la em um formato que funcione para o que você planeja fazer depois. Os dois formatos de arquivo que você encontrará 99% das vezes são JPEG e PNG. Podem parecer similares, mas têm trabalhos muito diferentes.
JPEG (Joint Photographic Experts Group): Este é seu padrão para quase todas as imagens digitais. JPEGs são fantásticos para seu portfólio de site, mídia social e envio de provas para clientes via email. Eles comprimem imagens em tamanhos de arquivo menores, o que significa que suas páginas web carregam mais rápido.
PNG (Portable Network Graphics): O superpoder de um PNG é sua capacidade de lidar com transparência. Se você precisar colocar seu cômodo renderizado em um fundo diferente—como em um folheto de marketing ou uma proposta de design de várias páginas—um PNG é a única forma de fazer isso.
Correspondendo Resolução ao Mundo Real
Finalmente, vamos falar sobre resolução. Resolução mais alta significa mais detalhe, mas também cria um arquivo muito maior. Você nem sempre precisa da qualidade absoluta mais alta; você apenas precisa da qualidade certa para a tarefa específica em questão.
Aqui está um guia de referência simples:
- Para a Tela (72-150 DPI): Ao mostrar renderizações para clientes em um monitor, em uma galeria de site ou em mídia social, uma resolução de 1920x1080 pixels é geralmente perfeita. Parece nítida e profissional na maioria dos displays sem ser um arquivo massivo.
- Para Impressão (300 DPI): Se essa renderização vai para um folheto impresso, um fichário de cliente ou um grande pôster para uma apresentação, você precisa de muito mais detalhe. Para evitar uma bagunça desfocada e pixelada, sempre aponte para pelo menos 300 DPI (pontos por polegada). Este é o padrão da indústria para qualidade de impressão profissional.
Como Profissionais Usam Renderizações de Design de Interiores
Uma renderização de design de interiores deixa de ser apenas uma imagem bonita e se torna uma ferramenta de negócios séria no momento em que você a coloca para trabalhar. Para profissionais em design, arquitetura e imóveis, essas imagens são muito mais do que apenas olho de boi; são ativos estratégicos usados para fechar negócios, suavizar a comunicação e acelerar linhas do tempo de projeto.
No seu cerne, uma renderização é uma potência de comunicação. Ela fecha a lacuna entre uma ideia abstrata e um resultado tangível, ajudando clientes e stakeholders a sentirem confiança genuína no potencial de um projeto.
Designers de Interiores Ganhando Mais Projetos
Para um designer de interiores, a batalha mais importante é frequentemente vencida muito antes do primeiro sofá ser encomendado. É vencida no pitch. Enquanto painéis de inspiração e amostras de tecido podem estabelecer um tom, uma renderização de alta qualidade permite que um cliente entre em sua casa futura. É um divisor de águas para obter aquele "sim".
Pense em um designer apresentando um conceito ousado para uma sala de estar. Em vez de confiar na imaginação, eles podem mostrar três opções distintas e totalmente realizadas:
- Opção 1: Um espaço calmo e inspirado em Escandinavo com madeiras claras e neutros suaves.
- Opção 2: Um visual vibrante e Mid-Century Modern com toques de cor e móveis icônicos.
- Opção 3: Um design sofisticado e minimalista focado em texturas ricas e linhas limpas.
Este simples ato tira toda a adivinhação do processo. O cliente não está apenas aprovando um conceito vago; está escolhendo uma realidade finalizada. Esse tipo de clareza visual também reduz o interminável vai e vem durante o estágio de feedback, pois todos estão olhando para exatamente a mesma visão.
Arquitetos Garantindo Aprovação de Stakeholders
Arquitetos têm um trabalho mais difícil. Frequentemente estão malabarando as expectativas de desenvolvedores, investidores, conselhos comunitários e comissões de planejamento ao mesmo tempo. Para eles, uma renderização de interiores é a chave para mostrar como um edifício realmente se sentirá por dentro. Uma planta baixa é uma coisa, mas mostrar a luz entrando em um átrio de pé duplo às 16h em uma tarde de inverno é algo completamente diferente.
Esses visuais são absolutamente críticos para obter aprovação durante as fases conceituais iniciais. Uma renderização pode demonstrar a escala humana de um saguão comercial expansivo ou capturar a atmosfera íntima de um hotel boutique. Ajuda os stakeholders a ver o valor do projeto além de plantas e balanços, tornando muito mais fácil obter aprovação de financiamento e manter as coisas em movimento.
Uma renderização é a forma mais eficaz de traduzir intenção arquitetônica em uma experiência emocional. Prova que um espaço não será apenas funcional, mas também desejável—um lugar onde as pessoas querem viver, trabalhar ou visitar.
Agentes Imobiliários Aprimorando Listagens de Propriedades
No mundo implacável de imóveis, as primeiras impressões são tudo. Uma renderização de design de interiores dá aos agentes uma enorme vantagem, especialmente com propriedades vazias ou em construção. Por que pedir aos compradores potenciais que "imaginem as possibilidades" quando você pode mostrar?
Imagine este cenário comum: um agente está tentando vender um apartamento completamente novo e vazio. As paredes brancas nuas e pisos vazios parecem frios e pouco atraentes, tornando difícil para os compradores se conectarem emocionalmente com o espaço.
Em vez disso, o agente pode usar uma foto do cômodo vazio para gerar várias versões virtualmente decoradas:
- Uma configuração quente e amigável para famílias para atrair casais jovens.
- Um design elegante e moderno direcionado a profissionais solteiros.
- Um estilo aconchegante e tradicional perfeito para atrair quem está reduzindo.
Ao incluir essas renderizações na listagem online, o agente alcança uma rede muito mais ampla. Os dados não mentem: casas decoradas vendem mais rápido e por mais dinheiro. A decoração virtual é uma forma poderosa e econômica de ajudar os compradores a se verem em uma propriedade, transformando uma casca vazia em um lugar que eles não conseguem esperar para chamar de lar. Para todos esses profissionais, elevar a qualidade de suas apresentações para clientes é o que os separa da concorrência.
Alcançando Fotorrealismo em Suas Renderizações
Qualquer um pode criar uma imagem, mas criar uma convincente? Esse é um jogo diferente. O obstáculo final para dominar a renderização de design de interiores é aprender a dirigir artisticamente suas criações até parecerem reais o suficiente para entrar. É isso que eleva um visual bom para um que realmente vende uma visão, transformando um arquivo digital em uma verificação emocional para seu cliente.
A mágica realmente se resume a três coisas principais: iluminação autêntica, materiais precisos e composição reflexiva. Quando esses elementos cantam em harmonia, sua renderização deixa de parecer uma imagem gerada por computador e começa a parecer uma fotografia de um espaço real e habitável.
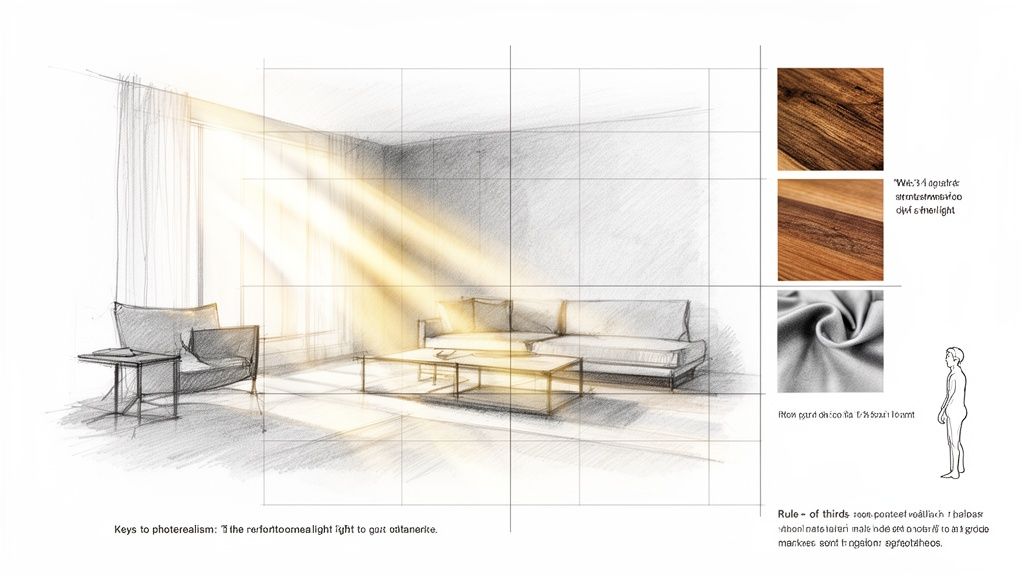
Dominando Luz e Sombra
Se você focar em apenas uma coisa, que seja a luz. É, sem dúvida, o ingrediente mais importante para realismo. A luz estabelece o clima, esculpe formas e dá aos materiais uma qualidade tangível. Não se contente com a configuração de iluminação padrão; assuma o controle e diga ao software exatamente o que você quer.
Pense como um fotógrafo e use prompts que descrevam tanto a qualidade da luz quanto a hora do dia:
- "Luz suave e indireta à tarde fluindo através de uma grande janela." Isso lhe dará aquelas sombras longas e suaves e uma atmosfera quente e aconchegante.
- "Luz matinal brilhante e nítida com sombras definidas e acentuadas." Isso é perfeito para espaços limpos e minimalistas que você quer que pareçam frescos e arejados.
- "Um brilho quente de uma lareira e várias luminárias de mesa." Use esse tipo de prompt para construir uma cena aconchegante e íntima à noite.
Acertando Materiais e Texturas
O segundo pilar do realismo é acertar os materiais para parecerem e se sentirem autênticos. É aqui que muitas renderizações fracassam—as superfícies parecem muito perfeitas, quase como plástico. O mundo real está cheio de imperfeições sutis: a rugosidade leve do linho, o relevo suave do veio de madeira, o brilho suave do metal escovado. Embora você possa gastar eras ajustando esses detalhes, muitas vezes ajuda usar a ferramenta certa para o trabalho. Você pode aprender mais sobre a seleção do software de renderização fotorrealista certo que lida com isso expertamente.
O segredo para fotorrealismo não é perfeição; é imperfeição. São as variações sutis em textura, reflexão e cor que enganam nossos olhos fazendo acreditar que uma imagem é real. Uma superfície perfeitamente lisa e uniformemente iluminada é a forma mais rápida de gritar "isso é falso".
Fique atento aos armadilhas comuns que destroem a ilusão. Reflexos não naturais, texturas dimensionadas incorretamente ou materiais que não reagem à luz adequadamente podem instantaneamente fazer uma cena parecer artificial. Sempre amplie e verifique os detalhes. O veio de madeira naquela mesa está esticado e estranho? Aquele espelho realmente reflete o cômodo com precisão? Um pouco de atenção extra aqui vai longe, resultando em uma imagem polida e profissional que realmente impressionará seus clientes.
Suas Perguntas, Respondidas
Começar com renderização de design de interiores pode parecer um pouco avassalador, então compilei respostas para algumas das perguntas mais comuns que ouço de designers.
Que Software Preciso para Fazer uma Renderização?
No passado, essa era uma pergunta difícil. A resposta costumava ser software complexo e caro como V-Ray, 3ds Max ou Lumion, que vêm com uma curva de aprendizado acentuada e exigem um computador poderoso.
Felizmente, essa não é a única rota mais. Plataformas modernas alimentadas por IA mudaram completamente o jogo. Ferramentas como MoldaSpace permitem que você crie visuais incríveis começando com algo tão simples quanto uma foto, um esboço rápido ou um modelo 3D básico exportado do SketchUp ou Revit. A escolha certa para você realmente depende de suas habilidades técnicas e da velocidade com que você precisa transformar ideias em realidade.
Quanto Custa uma Renderização de Design de Interiores?
Essa é uma pergunta "qual é o comprimento de um pedaço de corda?". O preço de uma única renderização de design de interiores pode variar muito dependendo de como você a faz.
Se você contratar um artista 3D freelancer ou uma agência especializada, pode esperar pagar de USD 250 a mais de USD 2.500 por apenas uma imagem. O preço final depende da complexidade do projeto e de quanto detalhe você precisa.
Ferramentas de renderização com IA, por outro lado, são construídas em um modelo totalmente diferente e muito mais acessível. Você pode frequentemente gerar dúzias de imagens de alta qualidade por menos do que o custo de uma única renderização tradicional. Isso torna a visualização de qualidade profissional uma possibilidade real para designers solo, pequenas empresas e agentes imobiliários.
Preciso Ser um Ótimo Artista para Criar uma Renderização?
Não mais, e isso é um enorme alívio para muitos designers. O fluxo de trabalho tradicional absolutamente exigia habilidade técnica profunda, começando com modelagem 3D meticulosa. Mas a IA torna essa parte do processo completamente opcional.
Se você consegue tirar uma foto clara de um cômodo, você tem tudo que precisa para começar a gerar renderizações bonitas e profissionais.
O foco mudou de execução técnica para direção criativa. Seu valor está em sua visão de design, não em sua capacidade de dominar software complexo. A IA simplesmente se torna a ferramenta que traz essa visão à vida instantaneamente.
Isso é um divisor de águas. Capacita designers cujos pontos fortes estão em estética, planejamento de espaço e relacionamento com clientes, em vez de em trabalho técnico 3D. Realmente abre a visualização de alta qualidade para todos.
A IA Realmente Pode Corresponder à Qualidade de uma Renderização Tradicional?
Sim. Para a maioria das necessidades profissionais, a qualidade definitivamente está lá, e a velocidade e flexibilidade incríveis que a IA oferece frequentemente a tornam a melhor escolha. A IA pode produzir imagens fotorrealistas com iluminação convincente, materiais e sombras que são perfeitas para apresentações de clientes, brochuras de marketing e decoração virtual.
Um artista 3D de primeira qualidade pode ser capaz de criar uma imagem ligeiramente mais personalizada depois de gastar dias nela, mas uma ferramenta de IA pode lhe dar dúzias de opções fantásticas em apenas alguns minutos. Para 95% dos casos de uso profissional, a qualidade é mais do que suficiente, e a eficiência está simplesmente em outro nível.
Pronto para transformar suas ideias de design em visuais impressionantes e vencedores de clientes em segundos? MoldaSpace oferece o poder de criar renderizações fotorrealistas a partir de uma foto simples ou esboço. Veja como funciona em MoldaSpace.