Unlocking AI Renders From Your Interior Design Sketch
Think of an interior design sketch as the designer's native language. It's that quick, expressive drawing that gets the core ideas of a space down on paper. We're not talking about a perfect piece of art here; it's all about communicating perspective, layout, and atmosphere long before we ever touch a piece of rendering software. This simple drawing is the creative DNA for everything that comes next.
Your Sketch Is the New Blueprint for AI Design
For years, that humble sketch has been our go-to for brainstorming and talking through ideas with clients. It’s always been the fastest way to translate a vision into something tangible. Now, that same hand-drawn sketch has become the jumping-off point for creating dozens of photorealistic concepts in minutes, thanks to AI visualization tools like MoldaSpace.
This doesn't push your creativity aside—it actually supercharges it. Your sketch is no longer just a static idea. Instead, it’s the key that unlocks a dynamic, incredibly flexible design process and opens the door to endless variations.
The Power of Rapid Visualization
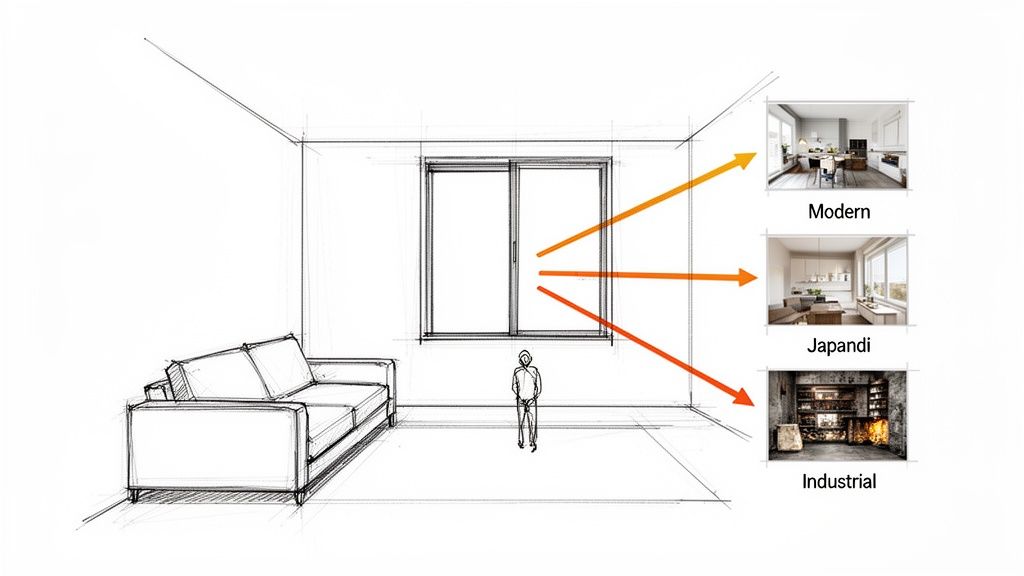
When you create a clean, well-composed sketch, you're giving the AI the essential structural information it needs to "see" your vision. From that one drawing, you can instantly spin up multiple design directions. This completely changes the game for presenting ideas and getting that all-important client buy-in.
Suddenly, you can:
- Explore Diverse Styles: Show a client what their living room looks like in Japandi, Industrial, or Mid-Century Modern without spending days creating manual renders for each one.
- Iterate on Materials: Instantly see the difference between a marble fireplace and a concrete one, simply by tweaking your text prompt.
- Empower Solo Designers: This levels the playing field. Solo designers and small studios can now produce the kind of high-end visualizations that used to require massive firms and dedicated rendering teams.
This isn't some far-off future; it's happening right now. The design world is embracing AI, with adoption rates expected to jump from 9 percent in 2023 to 29 percent by 2025. You can read more about this industry shift and see how designers are adapting to these new workflows.
The goal is no longer to create one perfect drawing. Instead, it’s to create a clear structural drawing that can become anything—giving you and your client the freedom to explore possibilities that were previously too time-consuming or expensive to consider.
Creating a Sketch That AI Can Actually Understand
Before you even touch pencil to paper, you need to get into a different headspace. You're not just sketching for a human anymore; you're creating a visual blueprint for an AI. A human can see a few loose lines and understand your artistic intent, but an AI like MoldaSpace needs clear, unambiguous instructions.
Think of your sketch as the foundational wireframe for a 3D model. If that wireframe is wonky, warped, or missing key information, the final result will be a mess. Our goal here is clarity over complexity. We’re giving the AI a solid set of instructions, not a piece of fine art.
Nail the Perspective
Perspective is, without a doubt, the most critical part of the puzzle. It’s what tells the AI how to build the room's geometry—where the walls, floor, and ceiling are and how they relate to each other. Get it wrong, and you'll get a flat, distorted image that looks like something out of a funhouse.
You've got two main choices here, and picking the right one is half the battle:
One-Point Perspective: This is your go-to for simple, head-on shots. Think of framing a feature wall, a fireplace, or the view from the foot of a bed. It's clean, direct, and easy for the AI to process.
Two-Point Perspective: This is for when you're looking into a corner and want to show two walls receding. It gives a much better sense of depth and space, making it perfect for showing how furniture is arranged in a living room or kitchen.
For most interior scenes, a two-point perspective gives the AI more data to work with, usually resulting in a more dynamic and realistic render.
I see this all the time: people accidentally mix perspectives or have lines going to random vanishing points. You have to be disciplined here. If lines are parallel in the real world, they must converge at the same vanishing point in your sketch. Consistency is everything.
Keep Proportions Plausible
Your sketch doesn't need to be drafted with an architect's precision, but the scale of objects relative to each other has to make sense. A sofa can't be the same size as a side table, and a standard doorway shouldn't scrape the ceiling.
These visual cues are how the AI understands what it’s looking at. If you draw a tiny armchair next to a gigantic window, don't be surprised when the AI spits out a bizarre, cartoonish room. It's just following your lead.
As you draw, constantly ask yourself: does this feel right? Is that coffee table at a realistic height? Could a person actually walk through that hallway? A quick mental check can save you from a lot of frustrating re-dos.
Finally, remember basic composition. Frame the shot to highlight what's important. Using the classic rule of thirds by placing a key piece—like a beautiful armchair or a piece of art—slightly off-center instantly makes the scene more compelling. You’re not just telling the AI what to build, you're telling it where to look.
A Practical Guide to Sketching for AI Renders
Alright, let's get down to the fun part: putting pencil to paper. The goal here isn't to create a masterpiece for a gallery wall, but to produce an interior design sketch that an AI can read and transform instantly. Think less about artistic flair and more about clear communication. The cleaner your lines and the more defined your structure, the better the AI will understand your vision.
Imagine you're a director setting the scene for a play. Your first job is to build the stage. Start by laying down the room’s core structure—the walls, floor, and ceiling. Whether you use a ruler or draw freehand, use long, confident strokes to establish the perspective. These lines are the absolute foundation of your sketch. Wobbly, uncertain lines will only confuse the AI, leading to distorted and funky renders.
Once you've got the "box" of the room down, start adding the major architectural elements. I'm talking about the fixed features that aren't going anywhere:
- Doors and Windows: Mark their placement and general size. No need for perfection, just clear indication.
- Built-in Shelving: Block out the overall shape, but don't get bogged down in drawing every single shelf.
- Fireplaces or Feature Walls: Define their main form so the AI has a clear focal point to work with.
At this point, your only mission is to create a solid, unambiguous framework.
Layering in the Core Elements
With the architecture locked in, you can start placing the main furniture pieces. This is where many people overthink it. Forget about drawing every leg on a chair or the handles on a cabinet. Instead, focus on blocking out the simple, geometric shapes of each item. A sofa is really just a big rectangle, a coffee table is a lower, wider rectangle, and a floor lamp is basically a line with a circle on top.
This visual breaks down that core thought process for creating a sketch that's ready for an AI to interpret.
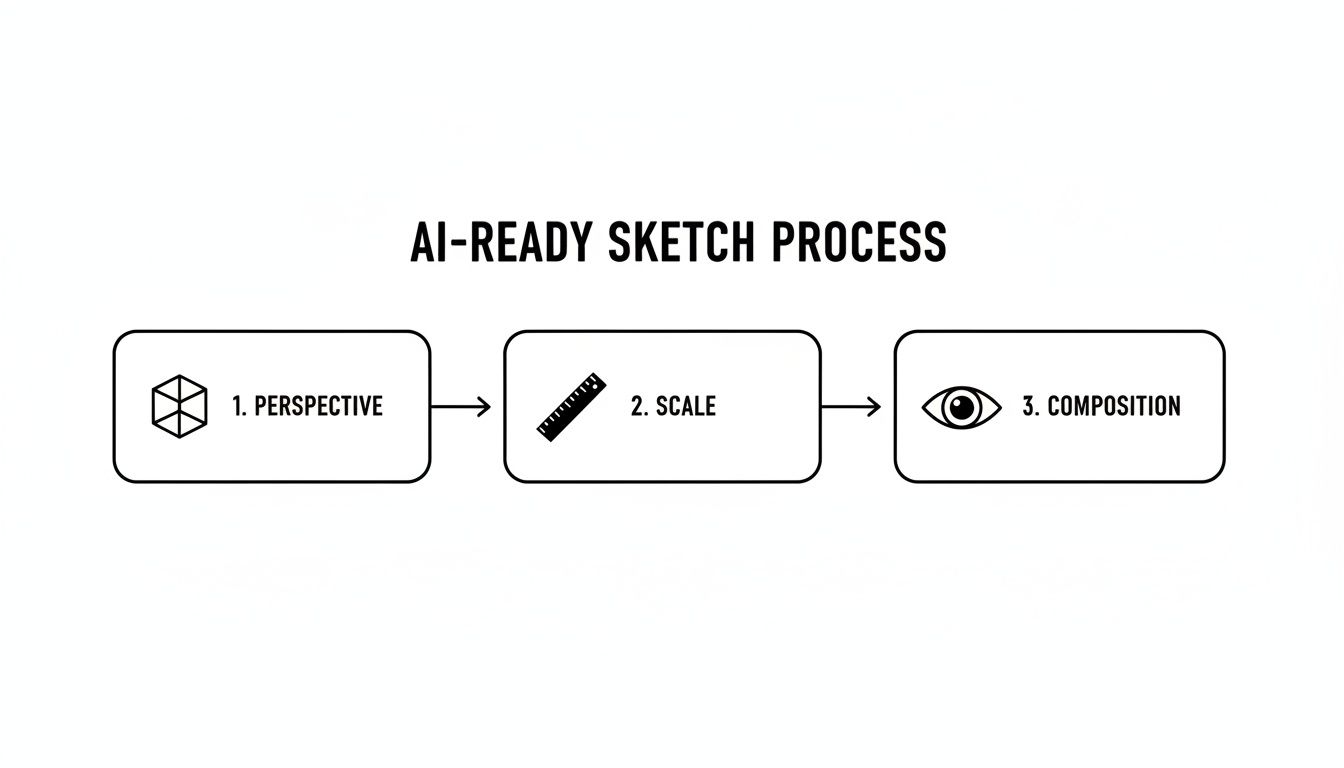
As you can see, establishing a clear perspective, making sure the scale feels right, and then refining the overall composition are the three pillars of a successful AI-ready sketch. By thinking in this structured way, you’re essentially giving the AI a very clear set of instructions.
One of the most common mistakes I see is designers adding way too much detail too early. An AI doesn't need to see intricate fabric patterns or wood grain in the sketch. In fact, it performs much better when you feed it clean shapes and then use text prompts to define those specific materials and textures later.
Indicating Materials and Annotations
While heavy, artistic shading is a definite no-go, you can use simple hatching to suggest different materials. A few parallel lines are perfect for indicating wood flooring, a simple crosshatch pattern can suggest a rug, and some light stippling could represent a concrete or stone surface. The key is to keep it minimal. You're just giving the AI a hint, not a finished portrait.
Finally, you might want to add a few simple annotations for clarity, especially if an object’s purpose isn't obvious from its shape. A simple arrow pointing to a wall with the word "Brick" or to a window with "Sheer curtains" can be incredibly helpful. Just try to keep these notes sparse and place them in the margins to avoid cluttering the actual drawing.
The difference between a sketch that works and one that fails often boils down to that one principle: clarity. You can see how this mindset applies to the final visuals in our guide on interior design rendering. Ultimately, a "good" sketch for AI is simple, bold, and structurally sound—the perfect blueprint for creating some truly incredible visualizations.
Getting Your Sketch Ready for the AI
Your hand-drawn sketch is where the creative spark happens, but for an AI to see what you see, that spark needs a clean digital path. The whole point is to turn your physical drawing into a digital file that's crystal clear, high-contrast, and free of any weird distortions that could throw the AI for a loop. Honestly, this step is just as critical as the drawing itself.
Think of it like this: the AI is a brilliant but very literal interpreter. It sees lines and shapes, not your artistic vision. A subtle shadow from your hand, a slight crease in the paper—these can easily be misinterpreted as a wall, a piece of furniture, or some other bizarre element you never intended. Nailing the digital capture is the essential bridge between your concept and a stunning, photorealistic render.
How to Get Your Sketch on the Screen
You’ve got two main ways to get your drawing into the computer: a flatbed scanner or your smartphone camera. While snapping a photo is fast and easy, I almost always recommend scanning for this kind of work. The results are just that much better.
A scanner gives you perfectly even light from corner to corner. This eliminates the shadows and bright spots that are a constant battle when using a phone. That clean, consistent background is exactly what the AI needs to see your lines and nothing else.
My Two Cents: If a scanner isn't an option and you have to use your phone, don't just snap a quick picture. Place your sketch on the floor directly under an overhead light. Stand right over it, holding your phone as parallel to the paper as you can to minimize distortion. And whatever you do, turn off the flash—it creates harsh glare and deep, confusing shadows.
Here’s a quick breakdown of the two methods to help you decide.
Comparing Digital Capture Methods
| Method | Pros | Cons | Best For |
|---|---|---|---|
| Scanning | - Even lighting - No distortion - High contrast - Superior clarity |
- Requires a scanner - Can be slower |
Final, detailed sketches where accuracy is paramount for the AI. This is the professional standard. |
| Photographing | - Fast and convenient - No special hardware needed |
- Uneven lighting/shadows - Prone to perspective distortion - Lower contrast |
Quick ideation and early-stage concepts when you just need a fast visualization and aren't worried about perfection. |
Ultimately, a scanner is your best bet for a flawless render, but a well-taken photo can work in a pinch if you're careful.
A Little Cleanup Goes a Long Way
Once your sketch is digitized, spending just a few minutes cleaning it up will have a massive impact on your results. You don’t need to be a Photoshop wizard; a few basic tweaks are all it takes.
These simple adjustments can make all the difference:
- Pump Up the Contrast: This is non-negotiable. Your goal is to make your lines as close to pure black as you can get them, with a background of pure white. The "Levels" or "Curves" tool in most editing software (even a free app like Snapseed) is perfect for this.
- Erase the Mess: Use a digital eraser tool to get rid of any stray pencil smudges, eraser marks, or handwritten notes that you don't want the AI to see.
- Straighten Things Out: If you used your phone, your image might have some perspective distortion. Use a perspective correction or transform tool to make sure all your vertical and horizontal lines are perfectly straight.
This bit of prep ensures the AI has nothing to work with but your clean, intentional design. You'll find this same principle of starting with a clean slate is crucial throughout the entire visualization process, which we explore more in our guide on the benefits of cloud-based rendering.
Finalizing Your File for MoldaSpace
The last step is to save your polished sketch in the right format and size. AI platforms like MoldaSpace are built to handle standard image files efficiently.
Just stick to these simple specs when you save:
- File Format: Save your file as a JPG or PNG. Both are widely supported and give you a great balance of image quality and file size.
- Resolution: Aim for a resolution between 1500 to 2500 pixels on the longest side. This is plenty of detail for the AI to work with, but it keeps the file size reasonable for a quick upload and processing time.
With a properly digitized and cleaned-up sketch, you're handing the AI the perfect blueprint. You've set the stage for a final render that’s not just impressive, but also true to your original vision.
Bringing Your Sketch to Life with MoldaSpace
Alright, you've digitized your sketch, and it's looking clean. This is where the magic happens. We're about to take that simple linework and turn it into a photorealistic render, and you'll be shocked at how quickly it all comes together. A tool like MoldaSpace is designed specifically for this—closing the gap between a hand-drawn idea and a client-ready visual.
The whole process is incredibly intuitive. Once you upload your PNG or JPG, the AI instantly gets to work, analyzing the bones of your drawing: the perspective, where you've placed the big furniture pieces, and the overall layout you've established. Your sketch becomes the fixed blueprint, the non-negotiable foundation for every design idea you're about to explore.
The Art of the Prompt
Your sketch tells the AI what and where. Your prompt tells it how. This is your chance to play art director. The words you choose will dictate the style, materials, lighting, and mood. The more specific you are, the closer the AI will get to what's in your head right from the start.
A great prompt usually weaves together three things:
- Style & Mood: Go beyond basic labels. Instead of just "modern," get descriptive. Think "A serene Japandi living room, filled with warm wood tones and minimalist furniture."
- Materials & Textures: Call out specific finishes for the key items in your drawing. For instance, "Give the armchair a textured bouclé fabric and the walls a soft, matte lime wash."
- Lighting & Atmosphere: Describe the light. How does it enter the room? What feeling does it create? Try something like, "Golden hour sunlight casting long, dramatic shadows from the big picture window."
This image is a perfect example of how one single sketch can spawn completely different design worlds just by changing the prompt.
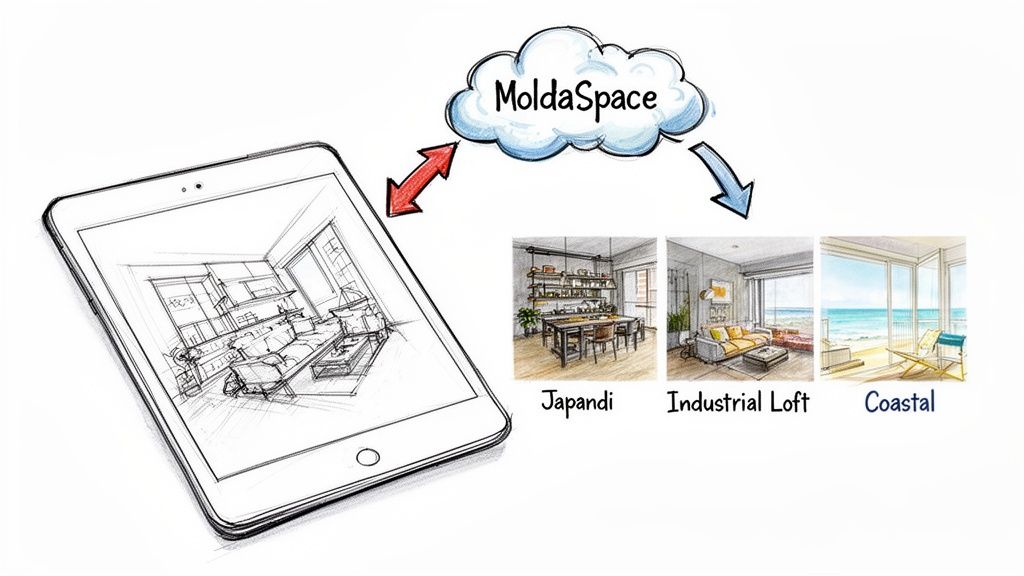
See how the room's structure—the walls, the window, the core furniture placement—never changes? That's your sketch doing its job as a reliable anchor for all your creative ideas.
A Real-World Workflow for Rapid Iteration
Let's imagine you're in the thick of it. You've just uploaded your clean sketch of a living room. In the next few minutes, you can generate a whole set of diverse options for a client meeting.
Prompt 1 (Industrial Loft):
An industrial loft living room with exposed brick walls, a distressed leather sofa, black metal light fixtures, and polished concrete floors. Bright, open, and airy.
Prompt 2 (Coastal Vibe):
A cozy coastal living room with white slipcovered furniture, a natural jute rug, light oak floors, and sheer linen curtains. Afternoon sun streaming through the windows.
Prompt 3 (Mid-Century Modern):
A classic mid-century modern living room featuring a walnut media console, a tapered-leg armchair in burnt orange upholstery, and a brass Sputnik chandelier.
For each of these prompts, MoldaSpace will deliver a brand-new render in about 30 seconds, always respecting the layout of your original sketch. This completely changes the dynamic of client presentations. You're no longer just pitching a single concept; you're leading a collaborative journey, exploring different futures for their space in real time.
This speed is a game-changer. What if the client loves the industrial brick but thinks the concrete floor feels too cold? No problem. You just tweak the prompt—"Change the floor to a warm, wide-plank hardwood"—and generate the updated version right there with them.
This fusion of a strong foundational sketch and precise, descriptive language is unlocking a more dynamic way to design. You can see more on how this is changing the industry by exploring the world of AI rendering for interior design.
Common Questions About AI Sketch Rendering
Making the jump from traditional sketching to AI-powered visualization can feel like stepping into a whole new world. It's totally normal to have a few questions as you start blending your hand-drawing skills with this powerful tech. Let's walk through some of the most common things designers ask when they're getting started.
The biggest question I hear is about detail. Just how much do you need to draw for the AI to "get it"? The answer is actually pretty straightforward: aim for clarity over complexity.
Think of your drawing as a solid blueprint, not a fully-rendered piece of art. The AI works best with confident, clear lines that define the big shapes, lock in the perspective, and map out where the key furniture goes. Tiny details, heavy shading, or intricate patterns in your sketch can actually confuse the AI, so it's best to leave those out for now.
Can I Use a Digital Sketch?
Of course! In fact, sketches made on an iPad or a drawing tablet are often perfect for this. If you’re using an app like Procreate or Morpholio Trace, the process is incredibly direct.
The most important step is exporting a clean, high-contrast line drawing as a JPG or PNG. Before you upload it to a platform like MoldaSpace, just make sure your layers are flattened and the background is a solid, clean white. This gives the AI the clearest possible "map" of your space to work from.
The AI reads your linework as a set of instructions. A messy digital file with stray marks or faint layers is like giving someone bad directions—you probably won't get the result you were hoping for. A clean export is everything.
What If the Render Isn't Quite Right?
It happens. Your first render might not be a perfect match for what's in your head, and that's a completely normal part of the creative process. Don't worry—just think of it as the start of a conversation with your new AI design partner.
First, take a quick look back at your original sketch. Are there any lines that could be read in two different ways? Any perspective quirks? Sometimes a quick cleanup of the source drawing is all it takes.
Next, sharpen your text prompts. This is where your real power lies. Instead of just saying "wood floor," try getting more specific. Something like "herringbone pattern dark walnut floor with a satin finish" gives the AI much clearer direction. Running a few variations with slightly different, more descriptive prompts is the fastest way to guide the AI exactly where you want it to go.
Ready to see your sketches transform into stunning, client-ready visuals in just a few clicks? MoldaSpace gives you the power to generate endless design variations from a single drawing. Explore new styles, iterate on materials, and present your ideas with confidence. Try it now at https://moldaspace.com.